You’re offline. This is a read only version of the page.


iPerf Information for AirMagnet Survey v9.2.3 and earlier
This document contains information specific to configuring two Windows computers to run iPerf with AirMagnet Survey Pro. iPerf is a 3rd party product, not supported by NetAlly, but you can get information on iPerf from the developer’s website.
Download iPerf 1.7
iPerf 1.7 is available for download at https://iperf.fr/iperf-download.php
Download the version you need for your operating system. This document will only reference Windows, but you could use a Linux, Mac or Windows computer as an iPerf server. The client should be a Windows computer, the one running the AirMagnet software.
Configure your network with an iPerf server and client
The following is a recommended setup:
Firewall Settings
The default port for the iPerf 1.7 is 5001, which is configurable; this port must be allowed to send/receive traffic to both the Server and the Client. You may need to open firewall ports if you are working in an environment that requires a firewall to be enabled. For Windows Firewall, see AM Survey: Configuring the Windows Firewall for iPerf Port Access; please refer to your vendor’s documentation for other operating systems.
iPerf Server
1. Connect the computer acting as a server to the network you intend to test via Ethernet:
2. Unzip and copy the iPerf software to the computer acting as the iPerf server
3. Launch a command prompt with administrative privileges:
4. Enter ipconfig at the command prompt and note your IP address
5. Navigate within the command prompt to the iPerf folder.
6. Enter iperf –s at the command prompt to start the iPerf server. This is what you will see:
C:\> iperf –s ----------------------------------------------- Server listening on TCP port 5001 TCP window size: 8:00 Kbyte <default> -----------------------------------------------Note that the server defaults to port 5001. To change the port, start the server with the –p switch:
iperf –p 5002 -s
If you change the server port here, it will need to be changed in AirMagnet software later.
At this point, the server is started and listening. To stop the server, hold Ctrl and C together.
iPerf Client
As with the server, unzip and copy the iPerf software to the computer acting as the iPerf client, the computer to intend to run Survey on, either placing it at the root of the C:\ drive or adding it to your PATH.
Verify the iPerf connection via Ethernet and set a baseline
For example, if your server is at IP 192.168.0.100, then enter:
iperf – c 192.168.0.100
The client and the server should connect and then report back the throughput information. As this was conducted over Ethernet, this is a good baseline from which to work.
Here is what the server shows when the client connects:

Here is what the client shows when connected:
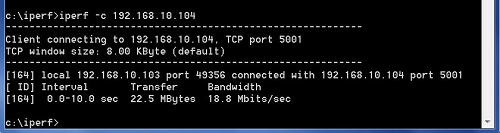
In this example, the baseline is 18.8 Mbits/sec as reported by both sides. You have verified the connection via Ethernet and have established a baseline.
See the next section for verifying the iPerf connection over WiFi.
If instead you receive a message that says 'OpenSCManager failed – access is denied', then you are not running the command prompt as an administrator.
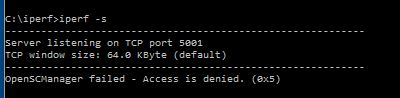
Close out the command prompt and re-open it by right-clicking the file and selecting Run as Administrator.
You might also receive an 'Unable to Connect message', which may be because a firewall is blocking port 5001. See the KB: AM Survey: Configuring the Windows Firewall for iPerf Port Access.
Verify the iPerf connection via WiFi
1. Disconnect the client computer from Ethernet,
2. Establish a connection to the SSID on the supported adapter you intend to use to survey,
3. On the client computer, run iperf with the following command:
iperf – c [IP address of server]
If successful as above, you have now verified that you can connect to the iPerf server using WiFi and you are now ready to use the AirMagnet software to conduct an Active iPerf survey (see sections below).
If not successful, troubleshoot to resolve any issues:
Using Survey PRO to conduct an active iPerf survey
Now that your iPerf client computer can connect over WiFi to the iPerf server and collect throughput data, you can now conduct an active iPerf survey within Survey Pro. Before opening Survey, be sure that you are able to connect to the SSID or AP that you wish to survey. See Am Survey: Configuring a Windows Wireless Profile for Active Surveys.
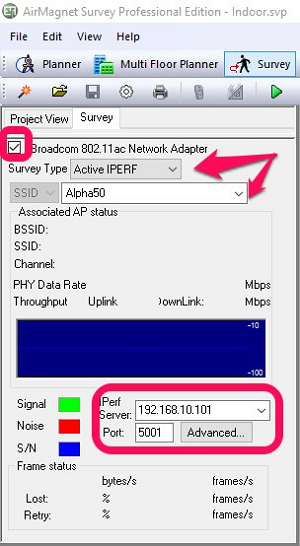
1. Open Survey and select the adapters you wish to use,
2. Click the Survey tab,
3. Configure your survey requirements:
4. Start your survey by clicking the Green triangle button in the Survey toolbar and collect your data,
5. Stop, Save and Display your data,
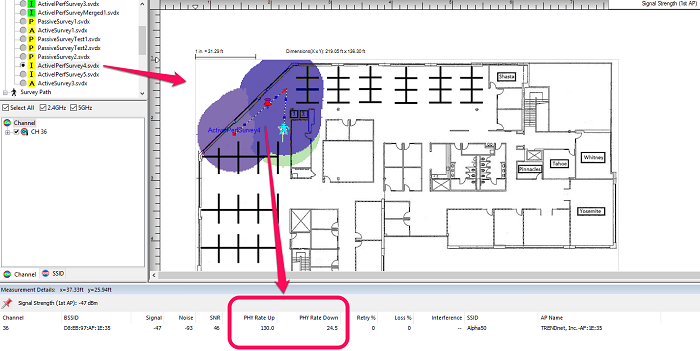
6. Click on the heat map to open the ''Dockable Heatmap Measurement Details Window'',
You will now see actual PHY Rate Up and PHY Rate Down throughput data:
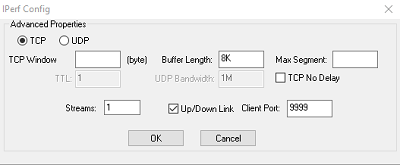
Advanced Active iPerf Settings
You can also configure Advanced Settings on the active iPerf survey by clicking the Advanced… button next to the Port entry
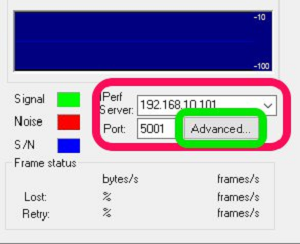
Adjust the following parameters as set on your iPerf server. If your iPerf server is set to the defaults, you do not need to change anything here.